I fixed my hybrid water heater
I own a hybrid heat pump hot water heater, an AO Smith HP10-50H45DV. It’s like a normal 50 gallon electric water heater, with a tiny air conditioner on the top. When it’s running in “efficiency mode”, the little HVAC system pumps heat from your house into the hot water, which is great during the summer. It uses about 33% as much electricity as a regular water heater. Remember the arrows in your science textbook showing heat flow in and out from air conditioners? When you’re interested in the hot side of the heat pump equation, you get to keep the energy you put into the heat pump too, so it’s a lot more efficient than cooling your house. So it pays for itself in about 3 years. If you don’t want the cold air, the noise, or you need lots of hot water, it can optionally fall back to a regular 4500 watt heating element.
And it turns out, if the HVAC system fails, it also falls back to the heating element. I discovered my water heater doing this, after noticing that it was running with just the heating element for a few days. You can tell based on the sounds it makes. It also had an error code on the little screen that reads “HPO”. The owner’s manual has a note:
The heat pump’s fan will not turn on if the incoming water temperature is less than 55°F/13°C and/or the ambient air temperature is above 120°F/49°C, or below 37°F/7°C. Should the internal diagnostics detect the heat pump is out of operational range, the Control Assembly will display the code HPO.
This didn’t make any sense. It’s late summer, so the incoming water isn’t less than 55 F. And the ambient air is in the upper 70s. I poked around the internet to see what I could learn about it. I found one youtube video of somebody fixing a competitor’s hybrid water heater (Rheem) by replacing the thermistors. This topic of thermistors was relevant to automotive A/C repair videos too. But there was nothing specific to this brand or error code.
I called the manufacturer, and a friendly technician chatted with me. He happily explained that they would help me troubleshoot and fix it, even if it meant replacing the whole water heater. After going through an extended “turn it off and on again”, he explained that they could only provide the parts, not the diagnostic labor. I asked if there was some kind of “advanced layman’s guide” to working on these water heaters, which made him chuckle. This prompted him to explain how HVAC technicians have very expensive tools, and have passed very rigorous training and certification courses.
Little did he know, I had an old Radioshack multimeter, and I’ve poked around inside applicances before. The service manual for some related AO Smith model explained how to access the diagnostic menu, which gave readings for a few temperature sensors. My “coil temp at hairpin of evaporator” was reading 123 F, which was preposterously high. After lots of googling to understand words like “suction”, “discharge”, and “hairpin of evaporator”, I located the sensors inside it. Along with some confirmation from a wiring diagram in the service manual, it was clear which sensor was which. These were the thermistors I saw in the first youtube video.
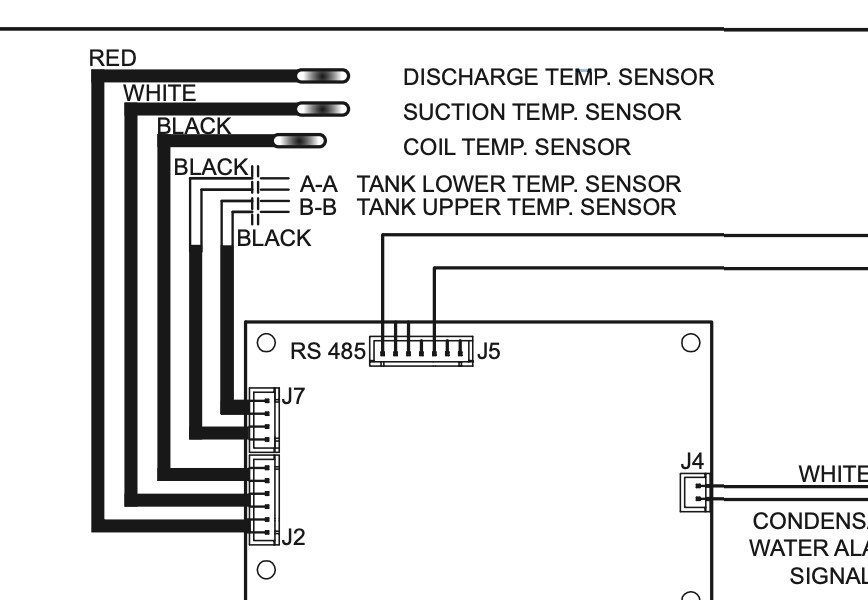
The 3 sensors plugged into the mainboard with a plastic white connector. Removing it, I could check the resistance of each sensor at the plug. The internet tells me that typical thermistor values are 10,000 ohms and up. My suction and discharge temp sensors read 10,000 and 45,000 ohms. But the coil temp sensor read 660 ohms, which was suspiciously low. That was the sensor that was reporting 123 F. So it seemed like the HVAC system was reading the evaporator coil temperature at startup to determine the ambient air temperature. Lower resistance means a higher temperature reading - bingo!
I called AO Smith back with a vague but truthful answer: Your tech said I needed to get an HVAC guy to diagnose it, and figure out what part we need. It turns out it was one of the temperature sensors. The diagnostic menu was showing…. and after checking the resistance, the coil temp sensor was only 660 ohms. Can we get part number X?
And they obliged! The new part has 3 thermisters for temperature sensors. 2 of them had roughly the same reading the old sensors, but the new coil temp sensor was much higher at 9,990 ohms.
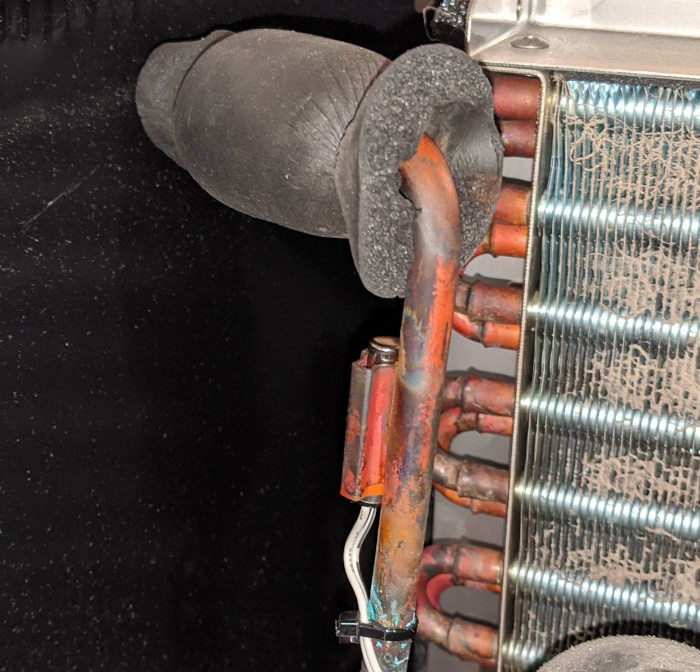
The process of replacing them wasn’t tricky. The sensors are surrounded with foam insulation, held tightly in place with zip ties. The foam insulation helps them get a better reading from their copper refrigerant line. A little metal spring helps hold each one in place. It’s annoying standing on a ladder and reading down into the water heater from the top, but it’s very doable for an eager layman. It’s also a great chance to clean out the evaporator coil. There are about a dozen metal screws around the top edge, holding the lid in place. Removing and replacing these accounts for probably half of the work! A few holes almost wouldn’t line up, but I was determined not to have any extra parts afterwards.
I tightened the screws, flipped the breaker on, and… nothing. Nothing happened because the water in the tank was still hot. After running my spigot for a bit, the water heater came to life. The familiar buzzing fan sound of the HVAC portion greeted me, woohoo! It’s a very satisfying part of life.
It’s unfortunate AO Smith doesn’t publish these service manuals clearly on their website. I only happened to find the service manual for a similar model on some small website. It’s also unfortunate the support technician didn’t guide me through using the diagnostic menu. It would have clearly shown the temperature sensor had an unrealistic reading, so we could have completely diagnosed this over the phone. But, it’s fixed now, and there’s something satisfying about tinkering with machines and reasoning about how they work.